
Yesterday someone asked me a question about the Star Braider the was included in Pixie’s 4th birthday Rainbow Collection. At the time I had tutorials on how to make her rainbow doll (not pictured) the lavender bean bags, the rag coiled bowl and the gnomes. It was always my intention to add 2 more posts; the first being how to make the wooden star braider and another post on how to weave the braid. I had taken photos, and even cropped them, then forgot all about it and moved on to other projects. It wasn’t until someone asked be about the star braider that I remembered I never finished it up!

So, I got myself a large cuppa joe, rolled up my sleeves, and set out to find the missing photos. Actually, I found them quickly, but I spent so much time going through all the photos of Bug, Fairy and Pixie from 5 1/2 years ago that it turned out to be quite a lengthy process. Oh My Stars… how they have grown!

Anyway… you will notice it is summer in these photos… not winter… and 5 years ago… but as the saying goes, better late than never! Today I will be sharing the tutorial on how to make the wooden star braider and in a couple of days I’ll share a tutorial on how to use the star braider to create the braids like the bracelet that Bug is wearing in the photo. So as promised, hehe, how to make a wooden star braider!
Materials:
- small piece of 1″ maple, popular or ash wood – use a hard, dense wood to prevent splintering of the edges
- paint – optional
- finish – beeswax or non-toxic food grade finish (I always use food grade when making any items children play with.)
- packing tape – optional
- pattern
NOTE: If you do not have the ability to cut out wood, you can use the pattern to cut the star out of a dense cardboard.
IF YOU ARE NEW TO WOOD WORKING… read the post found HERE before you begin!
Begin by making a copy of the pattern.
Cover the pattern with packing tape and cut out the shape.
Place the pattern on the wood and trace around the edge.
Cut out the wood using a scroll saw or a hand held coping saw.
Cut 1/16″ wide slits into the star as indicated on the pattern. Tim did this on the table saw making 2 cuts near each other to make the openings 1/16″. This can also be done with a hand saw.
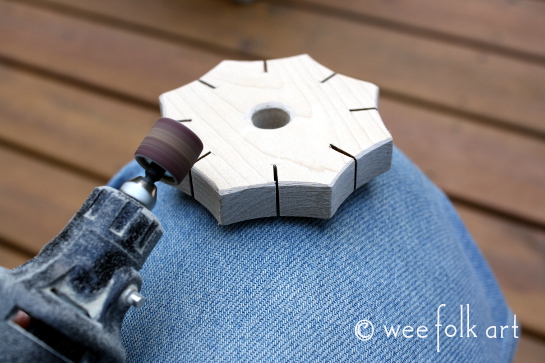
Using a hand held drill of drill press, drill a hole in the middle of the star that is 1/2″ wide.

If you have a dremel, use to to sand the edges of the star on both sides. Bevel the edges slightly.
Using sandpaper folded in half, sand the inside of the slits and the center hole. If is very important to make the slits and hole smooth so your yarn and thread do not snag on the wood.

Go over the outside of the star with sandpaper until the wood is completely smooth.

If you want, you can leave the star natural, but I prefer to add a finish to them. Normally, I finish the natural wood with a beeswax finish like our recipe which can be found HERE or use a non-toxic food grade finish like the one you can find HERE.

Watch for Part 2 :: How to use your Star Braider.
The post Part 1 :: How to Make a Wooden Star Braider appeared first on Wee Folk Art.